You have a reconstituted vial of BPC-157 in the refrigerator, an insulin syringe still in its wrapper, and a knot in your stomach that has nothing to do with peptides. The needle is small. The process is simple. Inject subcutaneously near the injury site or in the abdominal fat, using a 29 to 31 gauge insulin syringe, after reconstituting the lyophilized powder with bacteriostatic water. Pinch the skin, insert at 45 degrees, push slowly, done.
This guide covers each step of the injection process in detail: choosing the right site for your injury, selecting the correct syringe, maintaining sterile technique, and avoiding the mistakes that cause bruising, infection, or wasted peptide. If you need broader protocol guidance covering oral dosing, cycle length, and stacking, see the complete how to take BPC-157 guide. For dose calculations, use the BPC-157 dosage calculator.
BPC-157 is not FDA-approved for any medical use. All information below reflects preclinical research and clinical practice observations. Consult a licensed healthcare provider before using any peptide.
Get your custom peptide protocol:
- Tailored to your body and goals
- Precise dosing and cycle length
- Safe stacking combinations
- Backed by peer-reviewed studies
- Ready in under 2 minutes
Subcutaneous vs. Intramuscular: Which Route for BPC-157?
Most BPC-157 users inject subcutaneously. This means placing the peptide into the fat layer just beneath the skin, not into the muscle. Subcutaneous injection is the default because it is easier to learn, less painful, and delivers approximately 90% bioavailability with steady absorption over 15 to 30 minutes.
Intramuscular injection places the peptide directly into muscle tissue. Absorption is slightly faster (10 to 20 minutes to peak plasma levels), but the trade-offs rarely justify the switch.
| Factor | Subcutaneous | Intramuscular |
|---|---|---|
| Needle gauge | 29 to 31 gauge, 0.5 inch | 25 to 27 gauge, 1 inch |
| Insertion angle | 45 degrees | 90 degrees |
| Pain level | Minimal (brief pinch) | Moderate (deeper penetration) |
| Bioavailability | ~90% | ~90% |
| Time to peak plasma | 15 to 30 minutes | 10 to 20 minutes |
| Best for | Most injuries, abdomen, near injury | Deep muscle tears only |
| Aspiration needed | No | Yes (check for blood vessel) |
| Bruising risk | Low | Moderate |
BPC-157 enters systemic circulation regardless of where you inject. A subcutaneous shot in the abdomen still reaches a torn rotator cuff through the bloodstream. Local injection near the injury simply adds a concentrated dose to that tissue during the initial diffusion phase. Cerovecki et al. (2010) demonstrated that local BPC-157 administration improved ligament healing across functional, biomechanical, and histological measures in a rat MCL transection model.
When to consider intramuscular: Only for deep muscle injuries (quad tear, hamstring strain, deep rotator cuff damage) where you want to place the peptide as close to the damaged fiber as possible. For everything else, subcutaneous wins on simplicity and comfort.
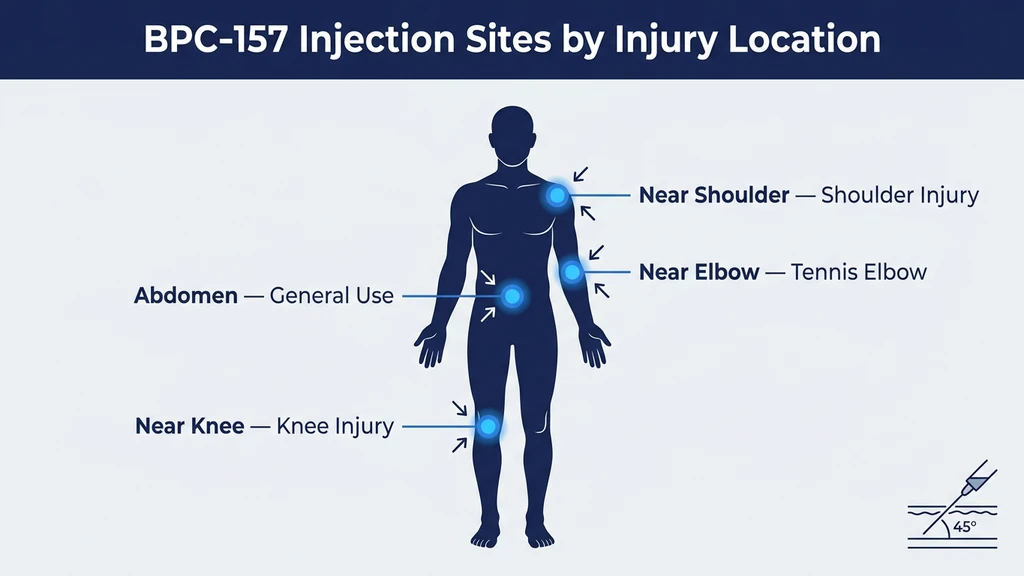
Choosing the Right Injection Site by Injury Location
Where you place the needle matters. Think of it like watering a garden with a hose. You can spray the whole yard and hope some water reaches the wilting plant. Or you can walk over and pour directly at its roots. BPC-157 injected near the injured tissue creates a high local concentration during the first 15 to 30 minutes of diffusion, before the peptide disperses into systemic circulation.
The literal principle: inject subcutaneously within 1 to 3 cm of the damaged structure. If the injury is inaccessible (deep hip joint, internal organ), inject in the lower abdomen for systemic delivery.
| Injury Location | Injection Site | Technique | Notes |
|---|---|---|---|
| Knee (ACL, MCL, patellar tendon) | Medial or lateral to kneecap, near joint line | Pinch skin beside kneecap, 45-degree angle | See knee injection guide |
| Shoulder (rotator cuff, labrum) | Subcutaneous over deltoid or anterior shoulder | Pinch deltoid fat pad, 45-degree angle | Rotate between anterior, lateral, and posterior |
| Elbow (tennis elbow, golfer's elbow) | Subcutaneous 1 to 2 cm from epicondyle | Pinch whatever skin is available | Thin skin here; use 31 gauge |
| Achilles tendon | 1 to 2 cm above or beside the tendon | Pinch skin lateral to the tendon | Never inject into the tendon itself |
| Wrist or hand | Dorsal (top) side of wrist, near injury | Minimal fat here; pinch gently | 31 gauge, very shallow angle |
| Lower back | Subcutaneous lateral to spine, near pain | Pinch love handle area | Easy access, adequate fat |
| Hip | Lower abdomen (systemic) | Standard abdominal technique | Deep hip joint is not accessible subcutaneously |
| Gut (IBS, ulcers) | Lower abdomen or oral route | Abdominal subcutaneous or swallow | Oral preferred for gut; see how to take BPC-157 |
| General recovery | Lower abdomen, 2 inches from navel | Standard pinch and inject | Rotate quadrants daily |
For women-specific injection considerations, see BPC-157 benefits for women. For weight-specific protocol details, the same dose applies regardless of body mass; see the 200lb male dosing guide for the pharmacological explanation.
Selecting the Right Syringe and Needle
The syringe you choose determines how much pain you feel, how accurately you dose, and whether you bruise afterward. There are only two decisions: gauge (needle thickness) and syringe volume.
Needle Gauge for BPC-157
Gauge measures needle diameter. Higher numbers mean thinner needles. Thinner needles hurt less.
| Gauge | Diameter | Length | Pain Level | Best For |
|---|---|---|---|---|
| 31 gauge | 0.26 mm | 5/16 inch (8 mm) | Barely noticeable | Thin skin areas (elbow, wrist, knee) |
| 30 gauge | 0.30 mm | 0.5 inch (12.7 mm) | Brief pinch | Standard subcutaneous (abdomen, thigh) |
| 29 gauge | 0.34 mm | 0.5 inch (12.7 mm) | Brief pinch | Standard subcutaneous; easier to draw from vial |
| 27 gauge | 0.41 mm | 1 inch (25.4 mm) | Noticeable | Intramuscular only |
| 25 gauge | 0.51 mm | 1 inch (25.4 mm) | Moderate sting | Intramuscular; never needed for subcutaneous |
The recommendation: 29 or 30 gauge, 0.5 inch, for subcutaneous BPC-157 injections. This size is thin enough to minimize pain, short enough to stay in the fat layer, and wide enough to draw liquid from the vial without excessive resistance. If you inject near bony areas with thin skin (elbow, knee, wrist), step up to a 31 gauge needle.
Avoid using needles thicker than 27 gauge. BPC-157 is a clear, water-based solution. It flows easily through fine needles. Thick needles are designed for viscous solutions like testosterone in oil. Using a 23 gauge needle for BPC-157 causes unnecessary pain and bruising.
Syringe Volume: 0.5mL vs. 1mL
Insulin syringes come in two common sizes: 0.5mL (50 units) and 1mL (100 units). Each small tick mark on a 1mL syringe represents 1 unit (0.01mL). Each tick mark on a 0.5mL syringe represents 1 unit as well, but the markings are spaced farther apart, making small doses easier to read.
| Syringe Size | Total Capacity | Tick Marks | Best For |
|---|---|---|---|
| 0.5mL (50 units) | 50 units | Wider spacing, easier to read small volumes | Doses under 25 units |
| 1mL (100 units) | 100 units | Standard spacing | Doses of 20 to 50 units |
If your dose is 10 units or less (common with high-concentration reconstitutions), use a 0.5mL syringe. The wider spacing between markings reduces the chance of drawing 8 units instead of 10. A 2-unit error on a 10-unit dose is a 20% dosing error. On a 50-unit dose, the same 2-unit error is only 4%.
For standard reconstitution math and how to calculate your dose in units, use the peptide reconstitution calculator.
Reconstituting BPC-157 Before Injection
BPC-157 ships as a white, freeze-dried powder (lyophilized) inside a sealed glass vial. You cannot inject powder. Reconstitution with bacteriostatic water converts it into an injectable liquid. The process takes under 3 minutes.
Step-by-step reconstitution:
- 1.Remove the plastic flip cap from the BPC-157 vial to expose the rubber stopper.
- 2.Swab the stopper with a 70% isopropyl alcohol pad. Let it air dry for 10 seconds.
- 3.Draw 2mL of bacteriostatic water into a syringe. For a 5mg vial, 2mL is the standard dilution.
- 4.Insert the needle through the rubber stopper. Aim the tip at the glass wall inside the vial, not at the powder.
- 5.Push the water slowly down the inside wall. Direct spray onto the powder can shear the peptide bonds through mechanical force.
- 6.Withdraw the syringe. Gently swirl the vial in small circles until the powder dissolves. This takes 30 to 60 seconds. The result is a clear, colorless liquid. Never shake. Aggressive shaking causes agitation-induced aggregation, which denatures the peptide (Manning et al., Pharm Res, 2010).
- 7.Label the vial with today's date and the concentration: "5mg / 2mL = 2500mcg/mL."
- 8.Refrigerate immediately at 2 to 8 degrees Celsius.
Use bacteriostatic water, not sterile water. Bacteriostatic water contains 0.9% benzyl alcohol, which inhibits bacterial growth and keeps the vial safe for up to 30 days. Sterile water has no preservative. Bacteria can colonize a sterile-water vial within 24 to 48 hours. By day 5, you are injecting contaminated liquid. For storage details, see does bacteriostatic water need to be refrigerated. For a deep dive on reconstitution technique for all peptides, see how to reconstitute peptides. For shelf life information, see how long reconstituted peptides last.
| Vial Size | Water Added | Concentration | Units for 250mcg | Units for 500mcg |
|---|---|---|---|---|
| 5mg | 1mL | 5000mcg/mL | 5 units | 10 units |
| 5mg | 2mL | 2500mcg/mL | 10 units | 20 units |
| 5mg | 2.5mL | 2000mcg/mL | 12.5 units | 25 units |
| 10mg | 2mL | 5000mcg/mL | 5 units | 10 units |
The 5mg vial with 2mL bacteriostatic water (2500mcg/mL) is the standard. It produces 20-unit draws for a 500mcg dose, which is easy to measure on any insulin syringe.
Step-by-Step Injection Process
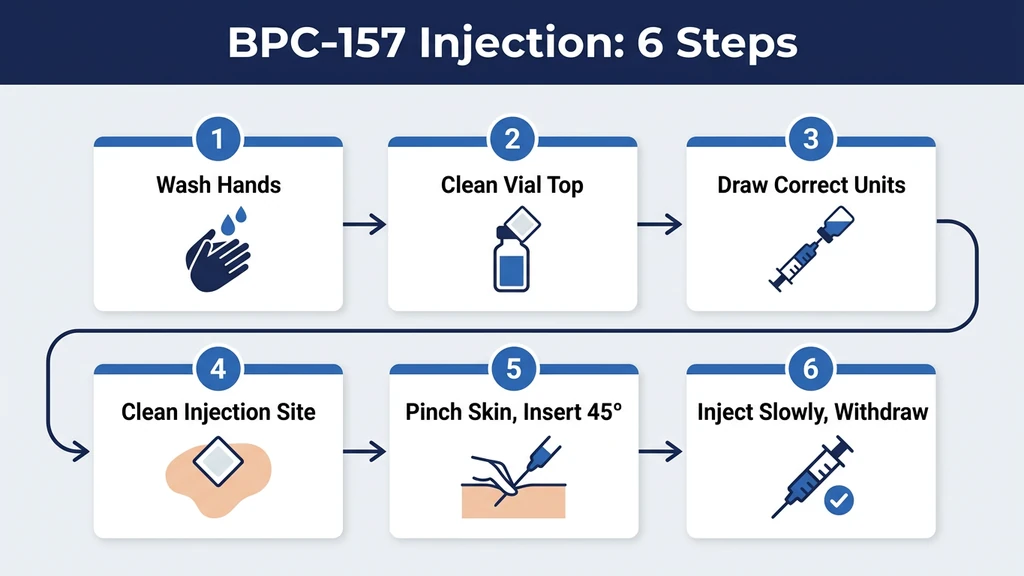
You have a reconstituted vial in the refrigerator and a fresh insulin syringe. Here is the complete injection sequence.
Drawing the Dose
- 1.Wash your hands with soap and water for at least 20 seconds. Dry with a clean towel.
- 2.Remove the vial from the refrigerator. If the peptide solution feels ice cold, let it sit at room temperature for 2 to 3 minutes. Cold liquid stings more on injection.
- 3.Swab the vial stopper with an alcohol pad. Let it dry for 10 seconds.
- 4.Pull back the syringe plunger to the number of units you need. For 500mcg at 2500mcg/mL concentration, that is 20 units.
- 5.Insert the needle through the center of the rubber stopper.
- 6.Push the air into the vial. This equalizes pressure inside the sealed vial and prevents a vacuum that makes drawing difficult.
- 7.Invert the vial so the needle tip sits submerged in the liquid.
- 8.Pull the plunger back slowly to your target volume. If air bubbles appear, flick the barrel with your fingernail 2 to 3 times. The bubbles will rise to the top. Push them back into the vial by advancing the plunger slightly, then redraw to your target.
- 9.Withdraw the needle from the vial. Return the vial to the refrigerator immediately.
Air bubbles in a subcutaneous injection are not dangerous. A few tiny bubbles will not cause an air embolism. The risk of air embolism applies to intravenous injection of large air volumes (over 3 to 5mL), not to 0.2mL subcutaneous shots. Still, removing bubbles improves dosing accuracy, because the air displaces peptide solution.
Performing the Subcutaneous Injection
- 1.Choose your injection site. Refer to the site selection table above. For a first injection, the lower abdomen (2 inches lateral to the navel) is easiest.
- 2.Swab the injection site with a fresh alcohol pad. Wait for the skin to dry completely. Injecting through wet alcohol causes a sharp sting.
- 3.Pinch a fold of skin between your thumb and index finger. Lift gently. You want the fat layer elevated away from the underlying muscle.
- 4.Hold the syringe like a pencil or a dart, with the bevel (angled opening) of the needle facing up.
- 5.Insert the needle at 45 degrees in one smooth, confident motion. Hesitation or jabbing increases pain. A quick, steady push is almost painless with a 29 to 31 gauge needle.
- 6.Release the skin pinch.
- 7.Push the plunger slowly and steadily over 3 to 5 seconds. Rushing forces liquid into a tight pocket under the skin, creating a stinging wheal (raised bump).
- 8.Count to 5 with the needle still in place. This pause lets the liquid disperse into surrounding tissue and prevents backflow through the needle track when you withdraw.
- 9.Withdraw the needle at the same angle you inserted it.
- 10.Press gently with a clean cotton ball or gauze pad if any blood appears. Do not rub. Rubbing can push the peptide out of the injection tract or cause bruising.
- 11.Cap and dispose of the syringe in a sharps container. Never recap by pushing the cap onto the needle with your other hand. Use the one-handed scoop technique (lay the cap on a flat surface and slide the needle into it) to prevent needlestick injuries.
The full process, from drawing to disposal, takes under 2 minutes. After 3 or 4 injections, muscle memory takes over and the sequence becomes automatic.
Sterile Technique and Infection Prevention
Injection site infections are the single most preventable complication of self-administered peptide therapy. Every infection traces back to a broken sterile protocol. The bacteria that cause cellulitis, abscesses, and systemic sepsis live on your skin, your countertop, and inside improperly stored vials. Sterile technique creates a barrier between those bacteria and your subcutaneous tissue.
Non-Negotiable Rules
One syringe, one injection. Never reuse a needle. The tip bends after a single use, creating a barbed edge that tears tissue on re-entry. A used needle also carries bacteria from your skin into the vial if you draw a second dose.
Alcohol swab twice. Swab the vial stopper before drawing. Swab the injection site before injecting. Let both surfaces air dry. Inserting a needle through wet alcohol pushes the alcohol into the tissue, which stings and can cause irritation.
Never touch the needle. If you accidentally touch the needle tip with your fingers, discard the syringe and use a new one. Your fingertips carry Staphylococcus aureus and other skin flora that cause injection site infections.
Clean workspace. Inject on a clean, flat surface with good lighting. A bathroom counter wiped with disinfectant works. A car dashboard does not.
Storage discipline. Return the reconstituted vial to the refrigerator within 2 minutes of drawing your dose. Cumulative room-temperature exposure over a 10 to 30 day use cycle degrades the peptide and allows bacterial growth if the vial stopper seal is compromised. For complete storage guidance, see how to store peptides.
Signs of Infection: When to Seek Medical Help
Normal post-injection signs: a small red dot at the needle entry point, mild itching that fades within an hour, a tiny bruise (especially near bony areas).
Warning signs that indicate infection:
- Redness that spreads beyond 2 cm from the injection site over 24 to 48 hours
- Warmth and swelling that increases rather than resolves
- Pus or cloudy discharge from the injection site
- A hard, painful lump that grows larger
- Fever, chills, or red streaking along the skin
If you observe any of these, stop injecting and see a doctor. An injection site abscess requires medical drainage and antibiotics. Attempting to treat it at home or "push through" with more BPC-157 will make it worse.
Rotating Injection Sites to Prevent Tissue Damage
Injecting in the same spot every day creates cumulative trauma to the subcutaneous fat layer. After 2 to 3 weeks of repeated injections in one location, you may develop lipodystrophy: small, hardened lumps or depressions in the fat tissue. These lumps alter peptide absorption, making your dose unpredictable, and can take months to resolve after you stop.
Rotation strategy for near-injury injections:
Imagine a clock face centered on your injury. Day 1, inject at 12 o'clock (1 to 2 cm above the injury). Day 2, inject at 3 o'clock. Day 3, inject at 6 o'clock. Day 4, inject at 9 o'clock. Then repeat. This keeps every injection within diffusion distance of the damaged tissue while distributing the needle trauma across four distinct sites.
Rotation strategy for abdominal injections:
Divide your lower abdomen into four quadrants: upper left, upper right, lower left, lower right. Each quadrant sits roughly 2 inches from the navel. Rotate one quadrant per day. After 4 days, start the cycle again. Move each injection point by 1 cm within the quadrant to avoid hitting the exact same spot.
| Day | Near-Injury Site (Clock Method) | Abdominal Site (Quadrant Method) |
|---|---|---|
| 1 | 12 o'clock (above) | Upper right |
| 2 | 3 o'clock (lateral) | Lower right |
| 3 | 6 o'clock (below) | Lower left |
| 4 | 9 o'clock (medial) | Upper left |
| 5 | Repeat from 12 o'clock | Repeat from upper right |
For knee-specific rotation maps by injury type, see the BPC-157 knee injection guide.
Pain Minimization Tips
Pain from a subcutaneous BPC-157 injection ranges from "felt nothing" to "brief pinch." Most discomfort comes from technique errors, not the needle itself. Fix these common causes and the process becomes nearly painless.
Let the solution warm slightly. Cold liquid stings. Remove the vial from the refrigerator 2 to 3 minutes before drawing. Do not warm it in hot water or a microwave. Room temperature for a few minutes is enough to take the edge off.
Wait for the alcohol to dry. This is the most common cause of injection-site burning. Alcohol pushed into subcutaneous tissue by the needle causes a sharp sting that lasts 10 to 20 seconds. Let the swabbed skin air dry for 15 seconds before inserting the needle.
Use a sharp, fresh needle. After a single puncture through the vial stopper, the needle tip develops microscopic barbs. Some users draw from the vial with one needle, then swap to a fresh needle for the injection. This "draw and swap" technique requires detachable-needle syringes, not fixed-needle insulin syringes. If you use standard insulin syringes, the single-puncture dulling is minimal and rarely noticeable.
Insert in one smooth motion. Slow, hesitant needle entry drags the tip through nerve endings in the dermis. A quick, confident push passes through the pain-sensitive layer in a fraction of a second.
Inject slowly. Push the plunger over 3 to 5 seconds. Rapid injection forces liquid into a small pocket that stretches tissue and stings. Slow delivery lets the liquid spread gradually.
Pinch firmly. A solid skin pinch lifts the fat layer and numbs the area slightly through pressure-induced analgesia. A weak pinch leaves the skin taut and makes the needle entry more noticeable.
Breathe out during insertion. Exhaling relaxes the abdominal wall and distracts from the momentary sensation. This is not mystical advice. Tense muscles resist the needle; relaxed tissue yields easily.
Common Injection Mistakes and How to Fix Them
These errors surface repeatedly in community reports and clinical practice observations. Each one is avoidable.
Technique Mistakes
Mistake 1: Injecting into muscle instead of fat. If you push a 0.5-inch needle straight in at 90 degrees on a lean person, the tip enters muscle tissue. The injection hurts more, bleeds more, and may cause a bruise the size of a coin. Fix: always insert at 45 degrees with the skin pinched. The angle keeps the needle in the subcutaneous fat layer.
Mistake 2: Pulling the needle out too fast. Yanking the needle immediately after pushing the plunger causes a bead of liquid to leak back through the needle track. You lose a portion of your dose and create a wet spot on the skin. Fix: count to 5 after completing the injection before withdrawing.
Mistake 3: Injecting through wet alcohol. This causes a burning sting that can last 20 to 30 seconds. Fix: swab the skin, then wait 15 seconds for it to dry completely before inserting the needle.
Mistake 4: Reusing syringes. A used needle has a dulled, barbed tip. The barbs tear tissue instead of parting it, which increases pain, bruising, and infection risk. A single box of 100 insulin syringes costs less than one vial of BPC-157. Fix: use a new syringe for every injection, no exceptions.
Dosing Mistakes
Mistake 5: Confusing units with milliliters. An insulin syringe reads in "units," not mL. 100 units equals 1mL. If your target dose is 20 units (0.20mL) and you misread the syringe as 2 units (0.02mL), you inject one-tenth of the intended dose. Fix: familiarize yourself with your specific syringe markings before the first injection. Practice drawing sterile water to the correct line.
Mistake 6: Miscalculating concentration after reconstitution. If you added 2mL of water to a 5mg vial, the concentration is 2500mcg/mL. If you think the concentration is 5000mcg/mL (the value for 1mL dilution), you draw half your intended dose at every injection. Over a 4-week cycle, you receive 50% less peptide than planned. Fix: label every vial with the exact concentration at reconstitution. Use the BPC-157 dosage calculator to verify your math.
Mistake 7: Drawing from the wrong vial. If you run multiple peptides (BPC-157 and TB-500, for example), the reconstituted vials look identical: clear liquid in a glass vial. Drawing from the wrong one delivers the wrong peptide at the wrong dose. Fix: label every vial clearly at reconstitution. Include the peptide name, concentration, and date. Store different peptides on separate refrigerator shelves if possible.
Danger Scenarios: Quantified Consequences of Errors
Most BPC-157 injection errors produce mild inconvenience: a bruise, a sting, a wasted dose. Two categories of error carry serious consequences.
Contamination from Broken Sterile Technique
A user reconstitutes BPC-157 with sterile water instead of bacteriostatic water. Sterile water contains no preservative. After the first needle puncture, bacteria from the skin surface enter the vial through the stopper. By day 5, the bacterial colony count in the vial reaches levels sufficient to cause local infection. By day 10, the user injects the equivalent of a bacterial broth. The result: a subcutaneous abscess at the injection site. Redness, swelling, and fever follow within 48 hours. Medical treatment requires incision, drainage, and a 10-day course of oral antibiotics.
The fix: always use bacteriostatic water (0.9% benzyl alcohol). Always swab the stopper. Always use a fresh needle. If the reconstituted liquid turns cloudy, develops visible particles, or changes color, discard the entire vial.
Concentration Miscalculation Leading to Overdose or Underdose
A user receives a 10mg vial but reads the label as 5mg. They add 2mL of bacteriostatic water and calculate the concentration as 2500mcg/mL (correct for a 5mg vial). The actual concentration is 5000mcg/mL. Every injection delivers double the intended dose. At a target of 500mcg per day, they receive 1000mcg per day.
BPC-157 has shown no lethal dose in any published study. Doses up to 20mg/kg in animals and 20mg IV in a human pilot study produced no adverse events (Staresinic et al., 2025). But a 2x overdose for 30 days wastes half your peptide supply and may increase the frequency of side effects like blood pressure fluctuation or sleep disruption.
The reverse error is equally common. A user adds 2mL to a 5mg vial and calculates the concentration as 5000mcg/mL (correct for a 1mL dilution). They draw 5 units, thinking they are getting 500mcg. They are getting 250mcg. After 8 weeks of underdosing, the injury heals slower than expected. The user blames the peptide when the real problem was arithmetic.
The fix: verify the vial label before reconstitution. Write the concentration on the vial with a permanent marker. Use the BPC-157 dosage calculator to cross-check every calculation.
Supplies Checklist: Everything You Need Before Your First Injection
Gather every item before your first injection. Scrambling for an alcohol swab mid-process while holding a loaded syringe is how contamination happens.
| Supply | Specification | Where to Find |
|---|---|---|
| BPC-157 vial (lyophilized) | 5mg or 10mg | Peptide supplier with third-party COA |
| Bacteriostatic water | 30mL vial, 0.9% benzyl alcohol | Sourcing guide |
| Insulin syringes | 29 to 31 gauge, 0.5 inch, 1mL or 0.5mL | Any pharmacy (no prescription needed in most US states) |
| Alcohol swabs | 70% isopropyl, individually wrapped | Pharmacy or online |
| Sharps container | FDA-cleared, puncture-resistant | Pharmacy or online; a thick plastic laundry detergent bottle works as a temporary substitute |
| Permanent marker | Fine-tip | For labeling vials with date and concentration |
| Clean flat surface | Well-lit, wiped with disinfectant | Kitchen counter, bathroom counter, desk |
Do not buy: large-gauge needles (18 to 23 gauge), glass syringes, reusable needles, or pre-loaded BPC-157 syringes from unverified sources. BPC-157 is a research peptide that degrades when stored in pre-loaded syringes for extended periods. Always draw from a freshly reconstituted, properly stored vial.
For guidance on evaluating peptide suppliers and reading certificates of analysis, see the peptide safety guide. For information on peptide sourcing in 2026, see where to buy peptides.
Frequently Asked Questions
What gauge needle is best for injecting BPC-157?
A 29 to 31 gauge insulin syringe with a 0.5-inch (12.7mm) needle. This gauge is thin enough to minimize pain, short enough to stay in the subcutaneous fat layer at a 45-degree angle, and wide enough to draw BPC-157 solution from the vial without excessive resistance. For thin-skin areas near bones (elbow, knee), use 31 gauge.
Should I inject BPC-157 near the injury or in the stomach?
Near the injury if you can access it subcutaneously. Injecting within 1 to 3 cm of the damaged tissue delivers a high local concentration during the initial 15 to 30 minute diffusion phase. Cerovecki et al. (2010) showed local administration improved ligament healing over systemic delivery. If the injury is deep (hip joint, internal organ), inject in the lower abdomen for systemic delivery.
How deep should I insert the needle for a subcutaneous BPC-157 injection?
A 0.5-inch (12.7mm) needle inserted at a 45-degree angle penetrates approximately 8 to 9mm, which places the tip in the subcutaneous fat layer for most body types. Pinch the skin first to lift the fat away from the muscle. If you are very lean with minimal body fat, use a 5/16-inch (8mm) needle at 45 degrees to avoid reaching the muscle.
Can I inject BPC-157 intramuscularly instead of subcutaneously?
You can, but subcutaneous is preferred for most situations. Intramuscular injection uses a longer needle (25 to 27 gauge, 1 inch), hurts more, and carries higher bruising risk. Bioavailability is approximately the same at 90%. Reserve intramuscular for deep muscle injuries (hamstring tears, deep quad injuries) where you want the peptide placed directly in damaged muscle tissue.
How long after reconstitution can I use BPC-157?
Up to 30 days when reconstituted with bacteriostatic water and stored in the refrigerator at 2 to 8 degrees Celsius. If reconstituted with sterile water (no preservative), use within 24 to 48 hours. Mark the reconstitution date on the vial with a permanent marker. If the liquid turns cloudy, develops particles, or changes color before 30 days, discard the vial immediately.
Does injecting BPC-157 hurt?
Minimal pain when done correctly. A 29 to 31 gauge needle produces a brief pinch lasting under 1 second. The most common causes of injection pain are injecting through wet alcohol (causes a 10 to 20 second burn), injecting cold solution directly from the refrigerator, and pushing the plunger too fast. Fix those three variables and most users describe the sensation as barely noticeable.
What happens if I accidentally inject BPC-157 into a vein?
Accidental intravenous injection during subcutaneous administration is extremely rare because the needle is short (0.5 inch) and inserted at a shallow angle. If it happens, the peptide enters systemic circulation faster than intended, but no adverse effects have been reported. A 2025 human pilot study administered 10mg and 20mg BPC-157 intravenously with no adverse events (Staresinic et al., 2025).
How many times can I draw from one BPC-157 vial?
A 5mg vial reconstituted with 2mL bacteriostatic water provides 10 doses at 500mcg per day or 20 doses at 250mcg per day. You can draw from the same vial repeatedly over its 30-day shelf life. Each needle puncture through the rubber stopper creates a tiny hole, but the stopper is self-sealing. After approximately 25 to 30 punctures, the stopper may leak. Most users finish a 5mg vial within 10 to 20 draws.
The Bottom Line
The injection itself is the simplest part of a BPC-157 protocol. Pinch the skin near your injury, insert a 29 to 31 gauge needle at 45 degrees, push the plunger slowly over 3 to 5 seconds, count to 5, withdraw. Under 2 minutes from start to finish.
What separates a clean, effective injection from a painful or contaminated one is preparation. Reconstitute with bacteriostatic water. Swab the stopper and the skin. Use a fresh syringe every time. Rotate your injection sites. Label every vial. Return it to the refrigerator immediately.
For the broader protocol covering dosing schedules, oral administration, cycle length, stacking with TB-500 and GHK-Cu, and timing relative to food and exercise, see how to take BPC-157. Use the BPC-157 dosage calculator to convert your target dose into syringe units, and the reconstitution calculator to verify your concentration math.
Related articles: - How Long Does Bacteriostatic Water Last? — shelf life rules for your reconstitution solvent - Bacteriostatic Water vs Sterile Water — why bacteriostatic water is essential for multi-dose vials - Is Reconstitution Solution the Same as Bacteriostatic Water? — comparing all diluent types - Where to Inject BPC-157 for Knee Pain — site-specific injection maps by knee injury type - How to Take BPC-157 — complete protocol covering dose, route, cycle, and stacking - Where to Buy Bacteriostatic Water — sourcing guide for USP-grade supplies
Related Articles
How to Inject Peptides: Full Guide
How to inject peptides subcutaneously and intramuscularly: supplies, needle gauge, injection sites, sterile technique, and site rotation.
How to Inject Tirzepatide: Full Guide
How to inject tirzepatide step by step: Mounjaro autoinjector pen technique, compounded vial subcutaneous injection, injection sites, and rotation schedule.
Where to Inject Sermorelin: Best Sites & Technique
Where to inject sermorelin for best results. Abdomen, thigh, and upper arm injection sites ranked, plus step-by-step subcutaneous technique and timing protocol.
Where to Inject BPC-157: Site Guide
Where to inject BPC-157 for shoulder, back, hip, gut, elbow, and Achilles injuries. Anatomical sites, local vs systemic delivery, and rotation.